Mastering the Exposure Triangle in Real Photography
The exposure triangle is the foundation of photographic technique. Aperture, shutter speed, and ISO are three variables that each affect exposure, and each carries its own creative consequences. Understanding how they interact is what allows you to move from reacting to light to controlling it. This is how I think about each element and how they work together in practice.
Aperture
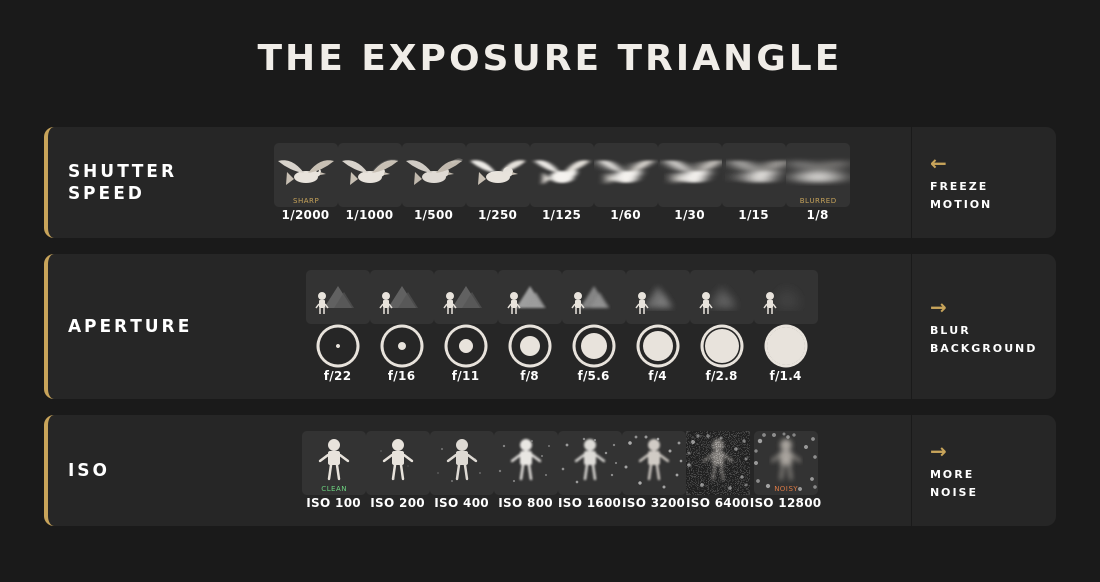
Aperture is the opening in the lens through which light passes. It is measured in f-stops, such as f/1.4, f/2.8, f/4, f/5.6, f/8, f/11, and f/16. A wider aperture, with a lower f-stop number, allows more light through and produces a shallower depth of field. A narrower aperture, with a higher f-stop number, allows less light and produces greater depth of field.
In wildlife photography, aperture is often the first decision I make. I want the subject sharp and the background soft, which usually means a wide aperture at a long focal length. In landscape photography, I usually want enough depth of field to hold the scene together, but that does not automatically mean using the narrowest possible aperture. In many cases, stopping down to around f/8 or f/11 gives the sharpest overall result, since very small apertures introduce diffraction that can actually reduce sharpness across the frame.
A wider aperture also produces the background blur, or bokeh, that isolates a subject from its environment. The quality of that blur is determined by the lens design and the distance between the subject and the background. A lens like the Sigma 300-600mm f/4 DG DN OS Sports at f/4, with a subject at 10 meters and a background at 50 meters, produces a smooth, creamy blur that removes distraction from the subject. This is one of the reasons long telephoto lenses are so effective for wildlife photography.
Shutter Speed
Shutter speed is the length of time the camera's sensor is exposed to light. It is measured in seconds and fractions of a second, such as 1/2000, 1/1000, 1/500, 1/250, 1/60, 1/30, and slower.
Fast shutter speeds freeze motion. For birds in flight, I typically start at 1/1000 second and move to 1/2000 second or faster for very fast-moving species. The goal is to freeze the wingbeat at a position that shows shape and detail. A blurred wing at the wrong moment can weaken the image entirely.
Slow shutter speeds introduce motion blur. Water becomes silk, clouds stretch, and moving subjects become streaks. In long exposure landscape photography, shutter speeds of several seconds to several minutes can transform a scene into something the eye cannot perceive in real time.
The relationship between shutter speed and camera stability is also critical. As a starting point, many photographers use the reciprocal rule. At 600mm, that suggests 1/600 second or faster. But with high-resolution sensors, long lenses, and moving wildlife, I often need to work much faster than that in practice. A tripod removes that variable entirely. I use a Leofoto LM-404C or Leofoto LS-362C for any work where shutter speed and stability are both part of the exposure decision.
ISO
ISO does not change how much light reaches the sensor. It changes how the captured signal is amplified, which affects brightness, noise, and usable image quality. Lower ISO values, such as ISO 100 or 200, require more light but produce cleaner results. Higher values, such as ISO 1600, 3200, or 6400, allow you to work in less light but introduce noise that appears as grain or color variation, particularly in shadow areas.
In practice, ISO is what I adjust to balance the aperture and shutter speed I need against the light that is available. In the golden hour, with good light, I shoot at ISO 400 or below. As the light fades, I increase ISO to maintain the shutter speed the subject requires. In my own work, the Panasonic Lumix S1RII remains very usable at ISO 3200 to 6400 when exposure is handled carefully and the file is processed well.
The principle is to use the lowest ISO that the situation allows, but never to sacrifice shutter speed or aperture just to keep ISO artificially low. A sharp image at ISO 3200 is always better than a blurred one at ISO 400.
The Interplay
The three elements of the exposure triangle are interconnected. Changing one requires compensating with one or both of the others to maintain the same exposure value. Increase the shutter speed by one stop, and you need to either open the aperture by one stop or increase the ISO by one stop to maintain the same brightness.
In practice, for wildlife photography, my priority order is shutter speed first, because the subject must be sharp, aperture second, because the depth of field should serve the image, and ISO last, using whatever is needed to make the first two work. For landscape photography, the order shifts. Aperture comes first for depth of field, ISO stays as low as possible for maximum quality, and shutter speed comes last, with a tripod allowing it to be whatever it needs to be.
Understanding the priority order for the type of photography you are doing is what allows you to make fast, correct decisions in changing conditions without rethinking every variable from scratch each time.
How This Looks in the Field
For a perched bird in soft morning light, I usually begin by deciding how much subject isolation I want, set the aperture accordingly, then establish the minimum shutter speed I trust for that bird's activity level, and only then raise ISO if needed to make it work.
For a bird in active flight, shutter speed becomes the priority. I set it first, often 1/2000 second or faster depending on the species and conditions, and everything else adjusts around that decision.
For a long exposure seascape at golden hour, the order reverses completely. I choose the aperture that gives me the depth of field the composition needs, lock the ISO at its lowest value, and let the shutter speed run as long as the light and the ND filter require.
Practical Tips
Use priority modes as stepping stones. Aperture Priority (Av/A) and Shutter Priority (Tv/S) modes let you set the critical variable and let the camera handle the rest. They are a good way to learn how the triangle works before committing to full manual.
Experiment deliberately. Set up a controlled situation with a static subject in consistent light and work through the range of apertures, shutter speeds, and ISO values. See how each changes the image. This builds intuition faster than reading alone.
Check the histogram, not the LCD. The LCD preview is affected by ambient brightness and is not a reliable indicator of exposure. The histogram shows the actual tonal distribution of the image. Learn to read it.
The exposure triangle is not complicated, but it takes time to internalize to the point where you can make decisions quickly in changing field conditions. That comes from practice, from reviewing what went wrong and why, and from shooting enough that the relationships become automatic. It is the technical foundation on which everything else in photography is built.
For how these decisions apply to bird and wildlife photography specifically, see Bird Photography and Mastering Bird Photography. For long exposure landscape work, where shutter speed becomes the creative center, see Landscape Photography with Long Exposure. For night sky photography, where ISO and aperture are pushed to their limits, see Capturing the Enchanting Milky Way.
Because shutter speed, stability, and support are tightly connected in real field use, I also rely on Leofoto tripods in situations where camera movement becomes part of the exposure decision.
Leofoto Coupon Code: 12% Off with EH12
Use code EH12 at checkout on the Leofoto website to get 12% off Leofoto tripods, ball heads, monopods, and accessories. This Leofoto discount code is active and available to readers of this site.