Mastering Focus and Depth of Field: Sharpness, Bokeh, and Creative Control
Focus and depth of field are the tools that determine what the viewer's eye goes to first in a photograph — and what it ignores. Getting them right is not just a technical matter. It is a creative decision that shapes the entire reading of an image. This is what I have learned about working with focus and depth of field across wildlife, landscape, and macro photography.
1. Understanding Autofocus Modes and Focus Points
Modern cameras offer several autofocus modes, each suited to different shooting situations.
Autofocus Modes
Single-Servo AF (One Shot AF on Canon, AFS on Panasonic) locks focus when the shutter button is half-pressed and holds it until the shot is taken. It is reliable and precise for stationary subjects — a perched bird, a static landscape, a flower.
Continuous-Servo AF (AI Servo on Canon, AFC on Panasonic) continuously adjusts focus as the subject moves. This is the mode for birds in flight, running animals, or any subject that changes distance from the camera. The camera predicts movement and adjusts focus in real time between frames.
Automatic AF switches between the two modes based on detected subject movement. It works well for general shooting but gives up the precision of selecting the correct mode manually.
Focus Area Modes
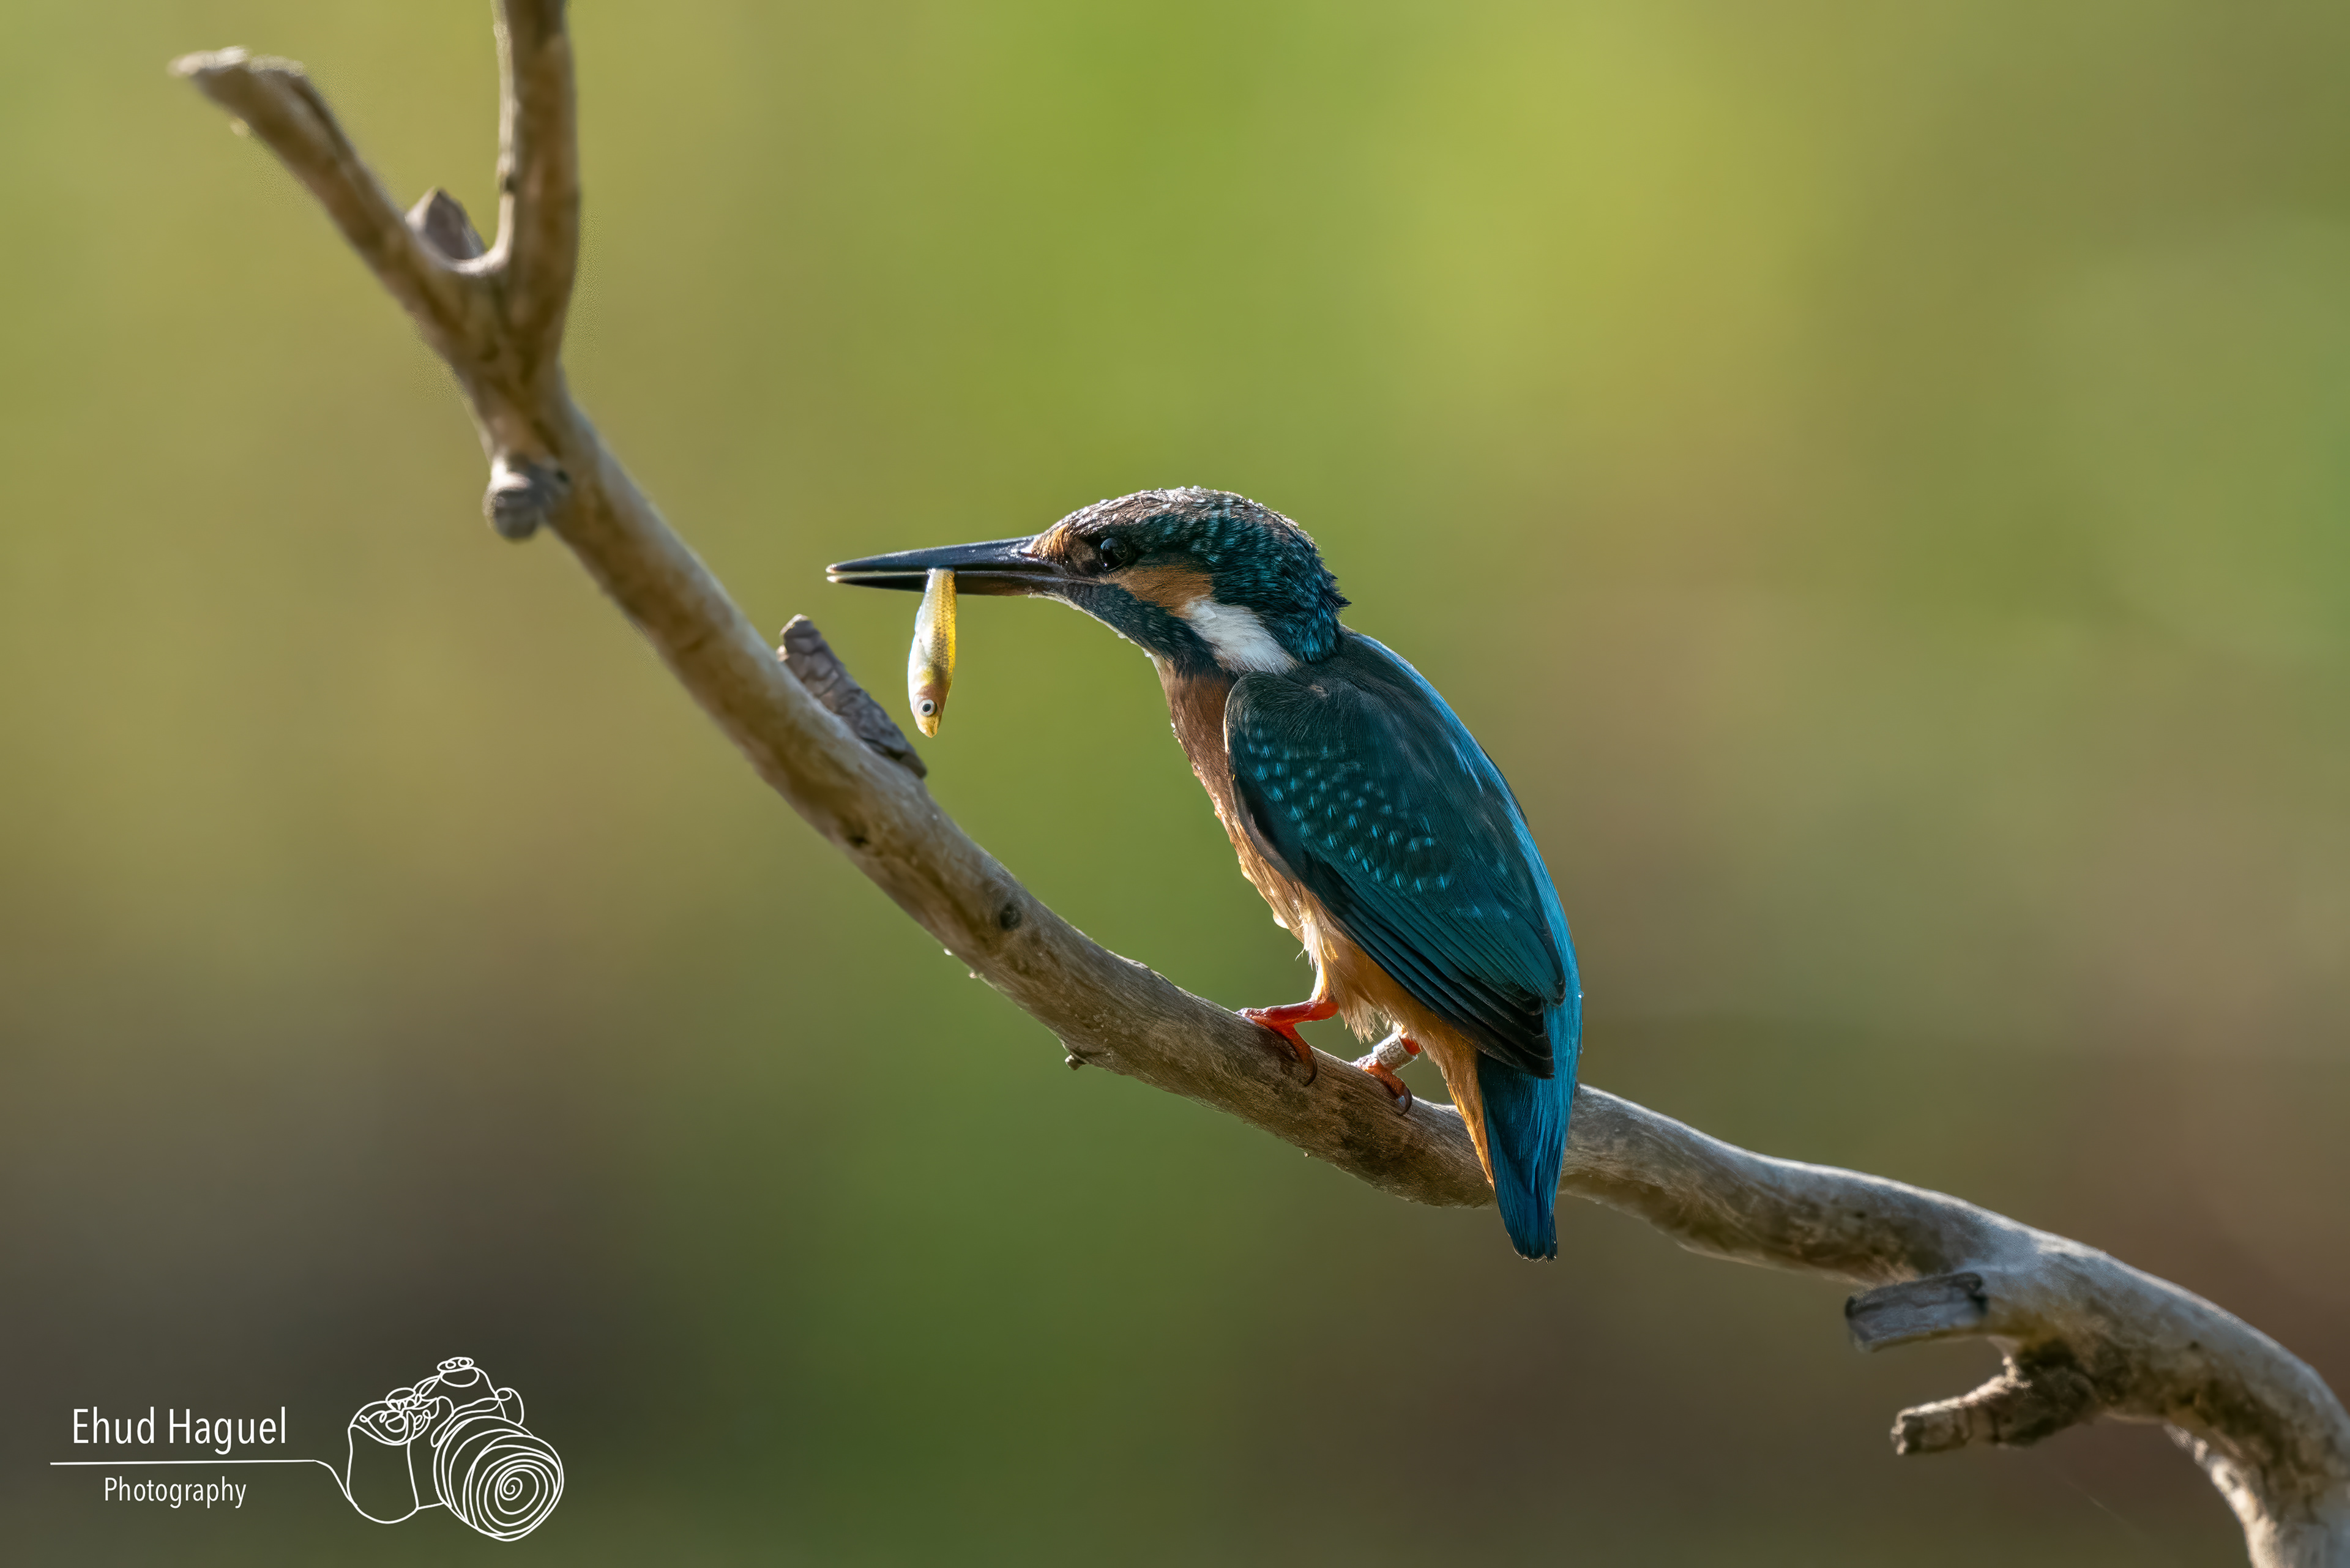
Single Point gives you the most precise control — place a small focus point exactly where you want it. Best for stationary subjects where accuracy matters, particularly for placing focus on the eye of a bird or animal.
Zone or Flexible Zone uses a group of points in a selected area. Useful for subjects that move within a limited part of the frame.
Wide Area or Full Frame allows the camera to choose from across the entire sensor. Fast and convenient but imprecise in complex scenes — the camera may lock onto the background rather than the subject.
Subject Detection and Animal Recognition uses AI to identify and track eyes, faces, and animals. On modern mirrorless cameras, this is increasingly the most effective approach for wildlife when the background is not too cluttered.
The practical principle: use the narrowest focus area that still reliably acquires the subject.
2. Techniques for Achieving Sharp Focus
Single Point Focus
Select a single focus point and place it directly on the subject. Half-press the shutter to lock focus, then recompose if needed. This works well for many static subjects — but at close distances or with very shallow depth of field, moving the focus point directly onto the subject is often more reliable than focus-and-recompose. When you recompose after locking focus, the plane of focus shifts slightly, which can be enough to miss critical sharpness at close range or wide aperture.
Continuous Focus
For moving subjects, set the camera to Continuous AF and use a zone of points that gives the autofocus system enough area to track the subject without losing it. Follow the subject smoothly — jerky camera movement makes tracking harder for the system. In complex backgrounds, narrow the zone to reduce the chance of the system locking onto something behind the subject.
Manual Focus
Manual focus gives you the most precise control and is particularly useful in macro photography, where autofocus can hunt at close distances, or in situations where the autofocus system is confused by complex backgrounds. It is also the right choice for night sky photography, where there is nothing for the autofocus system to lock onto.
3. Manual Focus Aids
When using manual focus, modern cameras offer tools that make precise focus much more achievable.
• Focus Peaking highlights the edges of in-focus elements in a selected color, giving you a real-time visual indicator of where the plane of focus falls. Useful for fast manual focus work and for confirming depth of field.
• Magnified Live View zooms into a selected area of the frame to allow precise focus confirmation. For tripod work — landscapes, macro, star photography — this is the most reliable method. Zoom to maximum magnification on a critical detail, adjust the focus ring until it is as sharp as possible, then return to the full-frame view to confirm composition.
• Manual Focus Override allows you to fine-tune focus manually even when the camera is set to autofocus. This is useful when the autofocus acquires the correct subject but you want to make a small adjustment without fully switching to manual mode.
4. Controlling Depth of Field
Depth of field — the zone of acceptable sharpness in an image — is influenced primarily by three factors: aperture, focal length, and the distance between camera and subject. The closer you focus, the shallower the depth of field becomes — which is why macro photography operates with an extremely thin plane of focus even at moderate apertures.
Aperture
A wider aperture (lower f-stop number) produces a shallower depth of field, isolating the subject from the background. A narrower aperture (higher f-stop number) increases depth of field, keeping more of the scene in focus.
Focal Length
Long telephoto lenses at wide apertures produce very shallow depth of field — one reason they are so effective for wildlife photography. The subject fills the frame and separates cleanly from a blurred background even at apertures like f/5.6 or f/6.3. Wide-angle lenses require very close focus distances or very wide apertures to achieve significant background blur.
Subject Distance
The closer the subject is to the camera, the shallower the depth of field at any given aperture and focal length. At macro distances — 1:1 or greater — depth of field can be just a few millimeters, even at f/8 or f/11. This is why focus placement in macro photography is so critical, and why small movements of the camera or subject between frames can mean the difference between a sharp image and a missed one.
5. Subject Distance and Background Distance
Two of the most practical controls over depth of field and bokeh are not aperture settings — they are your position relative to the subject, and the subject's position relative to the background.
• Subject distance: Moving closer to the subject reduces depth of field and increases the apparent size of the subject in the frame. Moving further away increases depth of field. Before adjusting aperture, consider whether changing your distance to the subject achieves the effect you want.
• Background distance: The further the background is from the subject, the more completely it blurs, and the smoother the bokeh becomes. A bird perched against a background 50 meters away will separate cleanly even at f/6.3. The same bird against vegetation 2 meters behind it may not separate cleanly even at f/2.8. Position is the primary tool — aperture is the secondary one.
These two factors together give you more creative control over subject isolation than aperture alone. A small change in your shooting position — moving left, crouching, or changing angle — can transform a cluttered background into a clean one without touching the aperture.
6. Bokeh
Bokeh is the aesthetic quality of the out-of-focus areas of an image. A lens that produces smooth, creamy bokeh makes backgrounds visually quiet and keeps the viewer's attention on the subject. The shape of the aperture blades, the optical design, and the distance between the subject and the background all influence the quality of bokeh.
Wide aperture lenses like the Sigma 300-600mm f/4 DG DN OS Sports and the Panasonic Lumix S PRO 50mm f/1.4 produce outstanding bokeh that works particularly well for wildlife and portrait subjects.
Bokeh is a compositional tool. A plain, distant background blurred by a wide aperture can transform a cluttered, distracting environment into a neutral canvas that makes the subject stand out.
7. Practical Focus by Subject
• Perched birds: Single point AF placed on the eye. Aperture Priority at f/4 to f/6.3 depending on how much depth of field the scene requires. If the background is complex, position yourself to maximize the distance between the subject and the background before adjusting aperture.
• Birds in flight: Continuous AF with a zone or subject detection. Aperture wide enough to maintain fast shutter speed — f/5.6 to f/8 gives enough depth of field to keep the whole bird sharp even if focus is not perfectly on the eye.
• Macro: Manual focus with magnified live view for final confirmation. Aperture between f/5.6 and f/11 — wider loses too much of the subject, narrower introduces diffraction. Use a tripod and focus rail if available. Subject distance is the primary variable.
• Landscape on tripod: Manual focus at or near hyperfocal distance. Magnified live view to confirm critical sharpness on the nearest important element. Aperture f/8 to f/11 for optimal sharpness across the frame without significant diffraction.
• Portraits and subject isolation: Single point on the near eye. Aperture as wide as the lens allows while keeping both eyes sharp if the subject is facing you, or only the near eye if the subject is at an angle. Background distance matters more than aperture.
8. Common Mistakes
• Focusing on the body instead of the eye. The eye is the viewer's anchor point in any image with an animal or person. If the body is sharp and the eye is soft, the image does not work — regardless of how well everything else is executed.
• Using too wide an aperture and losing critical sharpness. Opening to f/1.4 or f/2 for the shallowest possible depth of field can place the depth of field so thin that the subject's own features are partially out of focus. Choose the aperture that keeps the critical elements sharp, not necessarily the widest available.
• Trusting autofocus in cluttered backgrounds. In complex environments — dense vegetation, water with strong reflections, crowds — the autofocus system frequently locks onto the background rather than the subject. Use a single point or a narrow zone, and confirm focus before committing to a burst.
• Forgetting that close focus distance reduces depth of field. A lens set to f/8 at macro distance has far less depth of field than the same lens at f/8 focused at 10 meters. Many photographers discover this only when reviewing images — and find that what looked sharp in the viewfinder was not.
• Relying on aperture alone instead of changing position. As covered above — background distance is as important as aperture for subject isolation. Moving yourself is often faster and more effective than adjusting the aperture, and it does not cost a stop of light.
• Using focus-and-recompose at close distances or wide apertures. Recomposing after locking focus shifts the plane of focus slightly. At longer distances and moderate apertures this is negligible. At close range or very wide apertures it can be enough to miss the critical element.
Focus and depth of field are skills that develop through shooting, reviewing results, and adjusting. The technical understanding tells you what the controls do. What builds competence is making those decisions quickly in the field, in changing conditions, with subjects that do not wait.
Recommended Reading
If you want to deepen your understanding of exposure and how it connects to depth of field decisions, Understanding Exposure by Bryan Peterson explains the relationship between aperture, shutter speed, and ISO in a clear, practical way that is directly applicable to the decisions covered in this article.
For macro photography — where depth of field becomes extremely thin and focus placement is critical — see Macro Photography. For how these decisions apply specifically to bird photography, see Bird Photography and Mastering Bird Photography. For the broader exposure relationships that connect to depth of field, see The Exposure Triangle.
Leofoto Coupon Code: 12% Off with EH12
Use code EH12 at checkout on the Leofoto website to get 12% off Leofoto tripods, ball heads, monopods, and accessories. This Leofoto discount code is active and available to readers of this site.